Wama Men’s Hemp Underwear Review
Wama Men’s Hemp Underwear Review
Several months ago, we were contacted by the American company Wama which specializes in hemp underwear. They asked us to test some of their products and since we love to test base layers, we of course agreed. Now, hemp is not the most well-known material and before we got in touch with Wama, we didn’t really know much about it. According to online sources hemp garments are usually breathable, strong, UV resistant and odor-resistant (antimicrobial). Nevertheless, there is very little information available online on hemp as a performance fabric. Therefore, we were curious to test the Wama underwear on hiking trails and see how it performs.
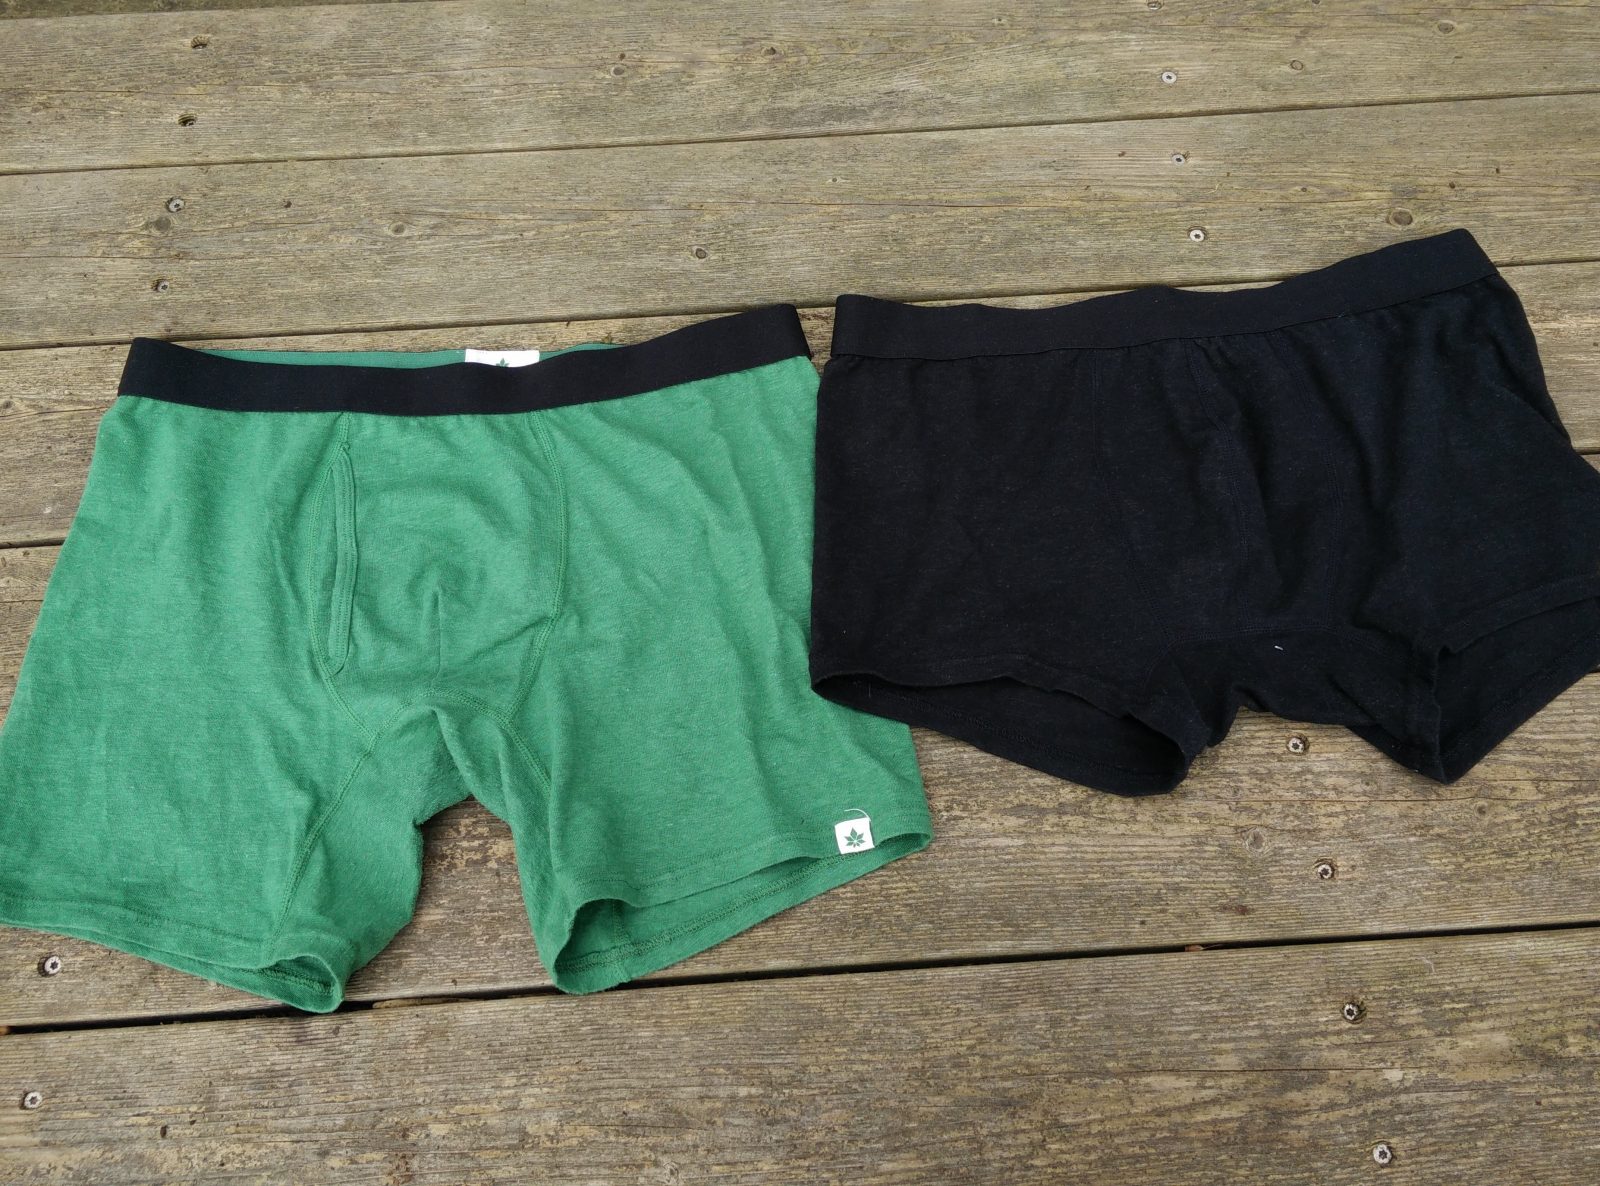
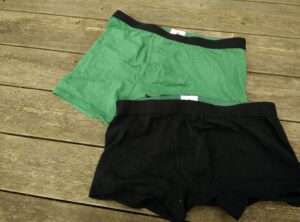
I received a pair of Wama Boxer Briefs and a pair of Wama Trunks. I thoroughly tested both garments on various hikes here in Denmark and I also wore them for running, gym training and other activities. Below is what I learned about Wama underwear.
Wama underwear is suitable for:
- Everyday use
- Hiking in warm and dry weather
Material
Wama Boxer Briefs and Wama Trunks are made of hemp, but they feature organic cotton and spandex fibers as well. Hemp is in general mostly mixed with other fibers for garments because it’s not very soft to the touch on its own. Nevertheless, it is supposed to get softer with every wash. The Wama underwear thus contains the following blend of fibers; 53% hemp, 44% organic cotton and 3% spandex. The cotton fibers make the garment softer and spandex fibers add stretch and recovery performance.
Both the Wama Boxer Briefs and Trunks are made of the same material and when I unwrapped them, I was surprised how strong the fabric is. It’s much more robust than polyester or Merino wool and thus I assume that this underwear will also have a longer lifespan. Both products are also very pleasant to the touch and feel nice against the skin. However, I did notice that the fabric is a bit thicker than the fabric of my other performance underwear. Nevertheless, it’s surprisingly porous for its thickness, which is good in terms of breathability.
While I was testing the Wama underwear I focused on breathability, moisture-wicking properties, drying time and odor-resistance. These are in my opinion the most important qualities when it comes to performance underwear. I wore the Wama Boxer Briefs for the first time on a long hike here in Denmark and I was impressed over the comfort at first. I noticed that despite the relatively thick fabric, the boxers provide good breathability. Many of my much thinner polyester boxers are not as breathable as the Wama boxers. To confirm this, I conducted a simple experiment of blowing air through the various fabrics of my performance underwear and observing the “resistance”. The Wama underwear is indeed some of the most breathable underwear I have.
However, when the intensity on the hike increased, and I started sweating I was less impressed with Wama underwear. While the boxers nicely pulled the moisture from my skin, they also absorbed most of it. Therefore, they dried slowly, and I got cold during every pause on the hike. I’m quite sure that the culprit is the high percentage of cotton fibers in the fabric and I’m indeed very curious how the hemp underwear would perform if it had been blended with Merino wool or polyester fibers instead of cotton. For more information about the various materials do check my guide to base layer materials.
After the hike I didn’t wash the underwear immediately in order to see how odor resistant it is. I can confirm that it does provide a certain level of odor resistance and doesn’t become as smelly as for example polyester underwear. However, it’s not as odor resistant as Merino wool underwear which you can basically wear for weeks and it won’t become smelly. The lower level of odor resistance is probably due to the high percentage of cotton as hemp is fairly odor resistant on its own according to many sources.
Comfort, fit, sizing and functionality
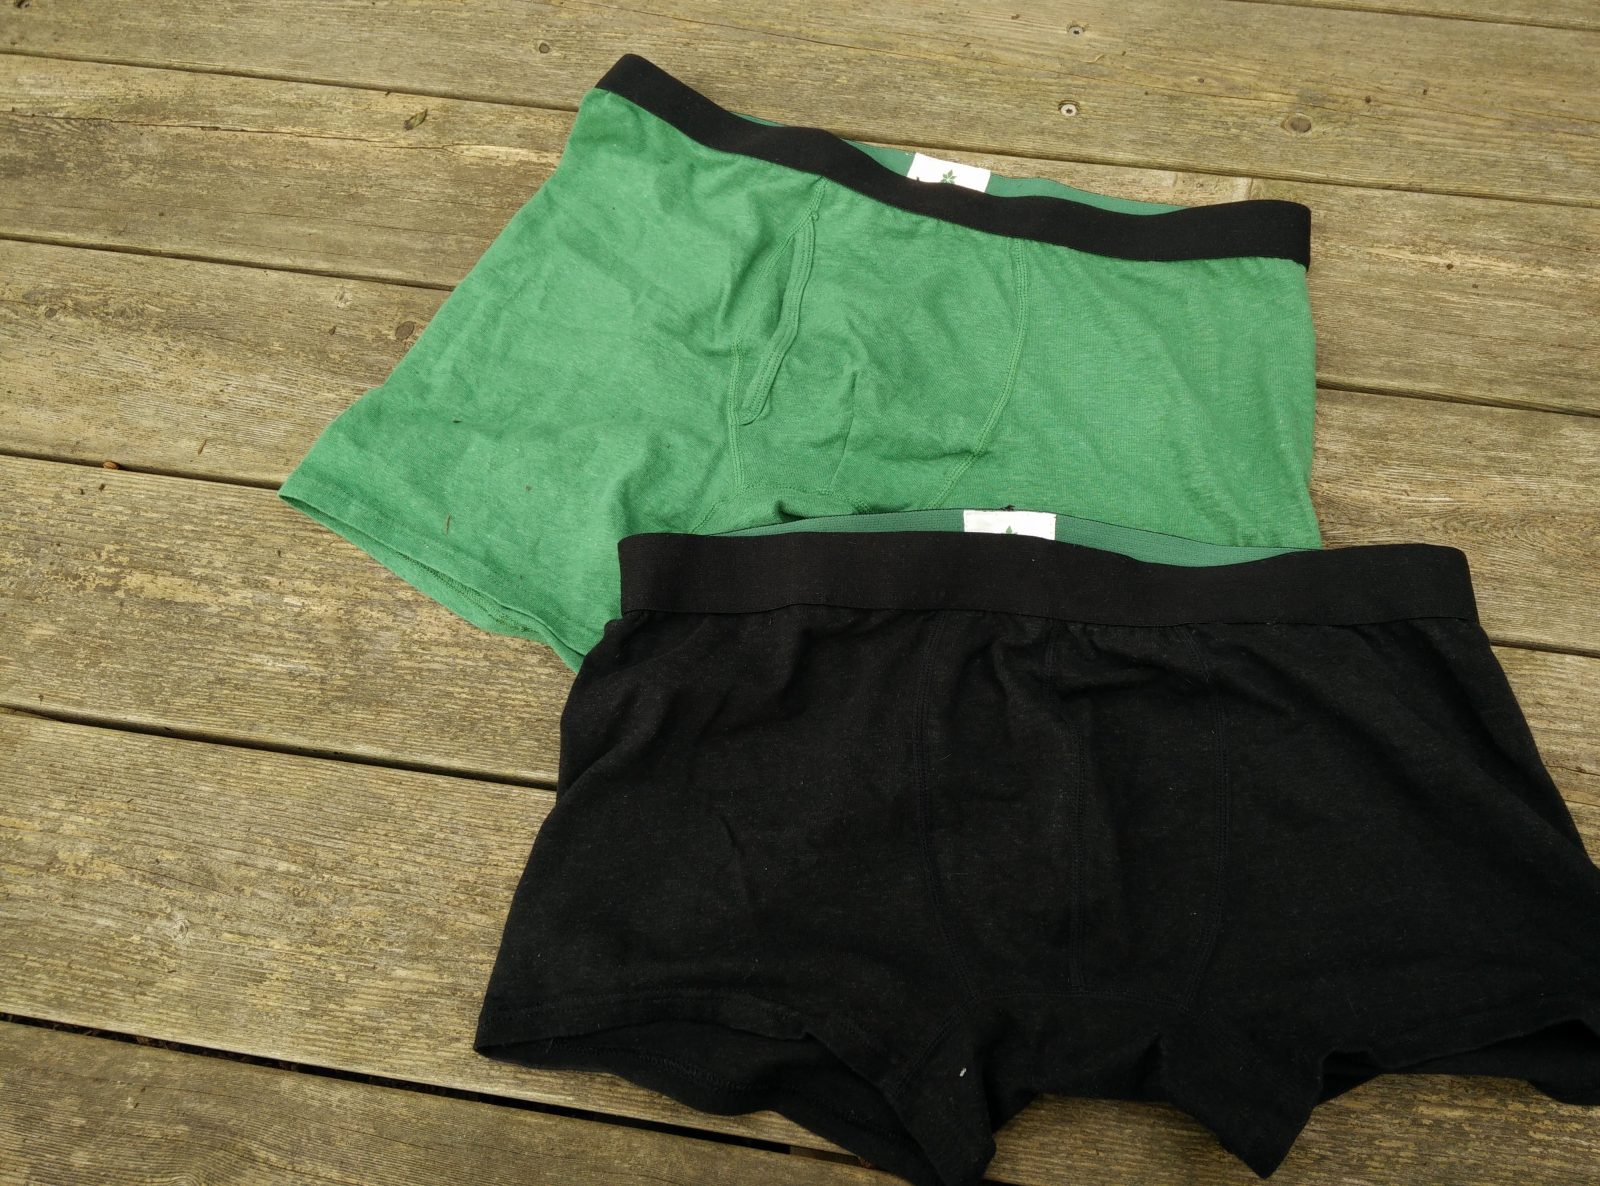
The Wama Boxer Briefs and the Wama Trunks fit tightly to the body and I found them so comfortable, I started wearing them for everyday use. The fabric feels nice against the skin and because it’s very stretchy it provides good freedom of movement. I also haven’t encountered any chafing or rubbing so far. The Wama Boxer Briefs are with the inseam length of 6 inches slightly longer than the Wama Trunks which have the inseam length of around 2 inches. I prefer the Wama Boxer Briefs but that’s purely a matter of personal taste.
Both pairs of underwear feature comfortable flatlock seams and a printed label to prevent chafing. The waist band is soft and provides good stretch. The Wama Boxer Briefs also have a fly. I got both garments in size XL and they fit me perfectly (my waist circumference is 94 cm / 37 in.). As most of my other performance boxers are in size L, I think that Wama underwear runs small. So, if in doubt, size up.
Washing and drying
Wama underwear can be machine washed at 30º C, but you should steer clear of softeners and bleach. The underwear also shouldn’t be tumble-dried. As the material is very robust, I don’t think that washing the garment regularly will reduce its lifespan.
Verdict
The Wama Boxer Briefs and Wama Trunks have become my underwear of choice for everyday use because they are breathable, durable and very comfortable. Furthermore, both garments are made of natural materials and provide great fit and support. However, for hiking and sports there are better options out there. The Wama underwear simply absorbs too much moisture and dries too slowly to be efficiently used for activities that make you sweat. I won’t go into details why sports require quick-drying clothes here but if you are interested in the topic check out my article Why should you wear quick drying clothes. That being said, I do think that Wama makes great everyday apparel which is not only functional but also environment friendly. Hemp doesn’t require pesticides or enormous amounts of water to grow like cotton, and is naturally biodegradable. So, it might very well be that hemp clothing has a bright future.
If you have any questions about this product, drop me a line in the comments below.
Wama Men’s Hemp Underwear: Wama Boxer Briefs and Wama Trunks below
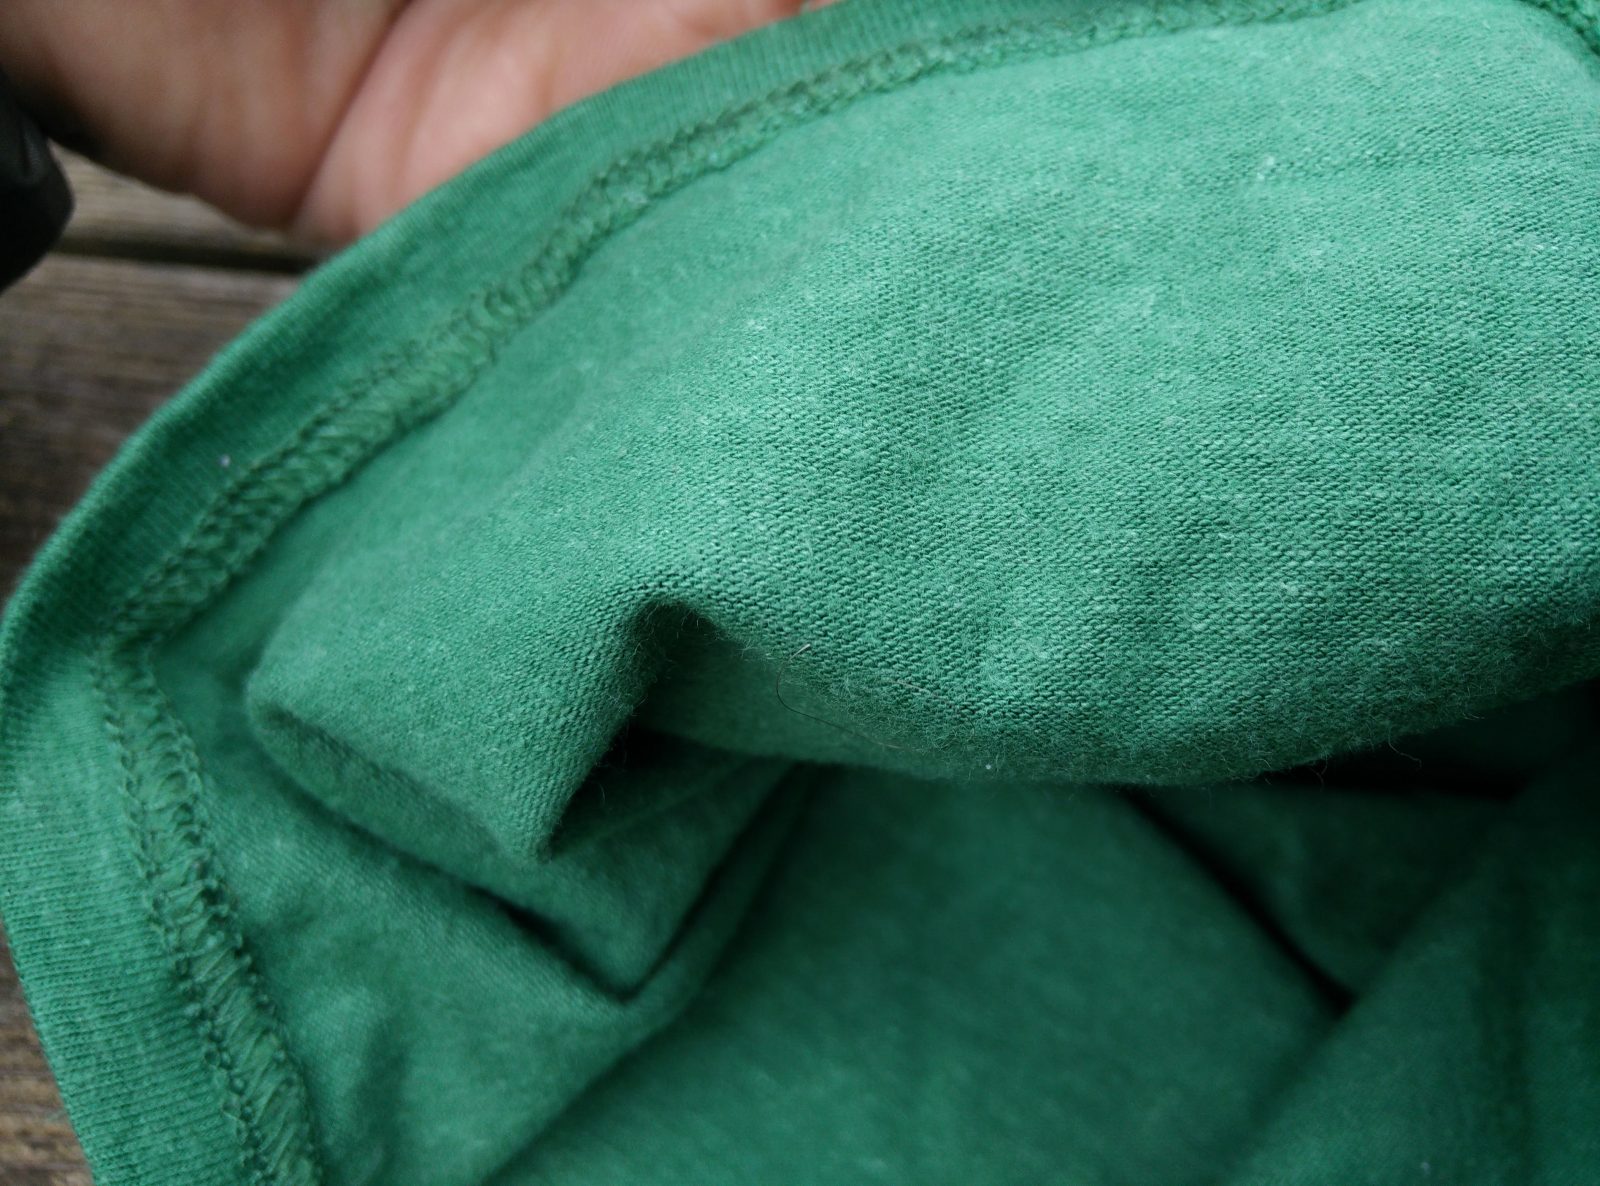
Wama Men’s Hemp Underwear – Fabric is very soft to the touch
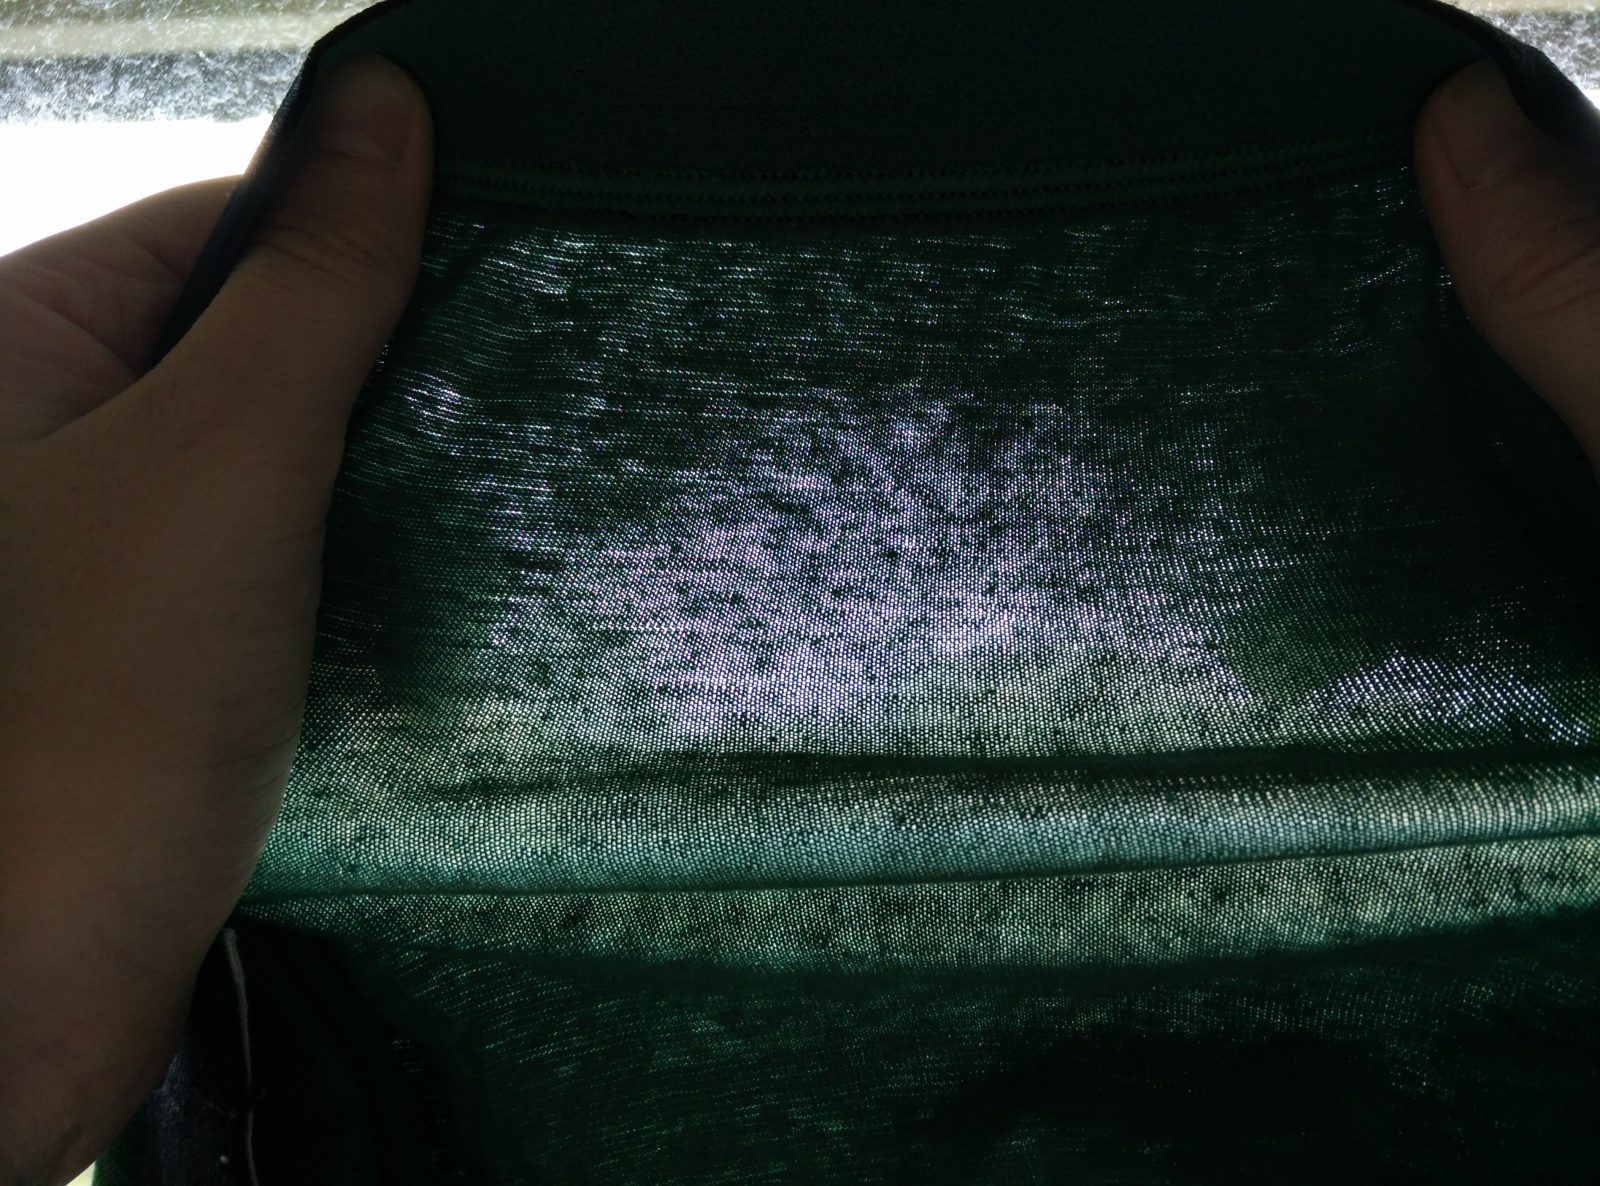
Wama Men’s Hemp Underwear – The fabric is very porous which is good in terms of breathability
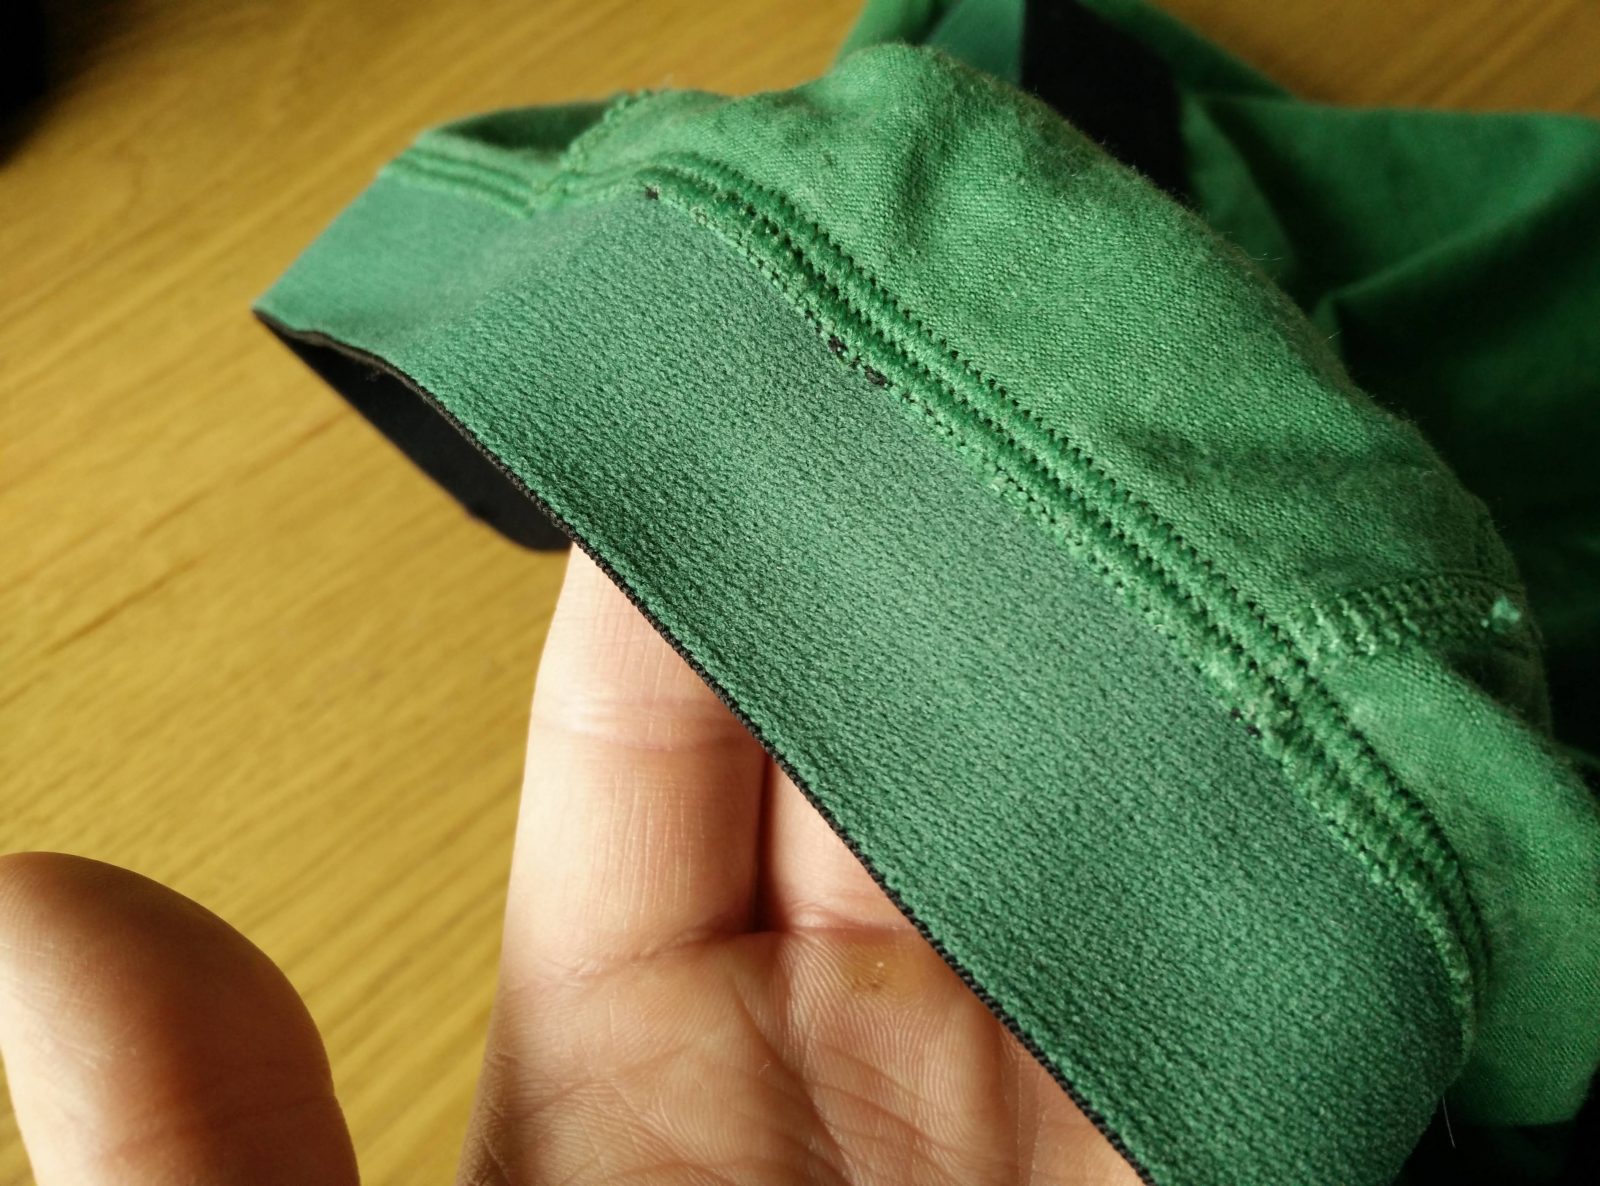
Wama Men’s Hemp Underwear – Logo on the waistband
Wama Men’s Hemp Underwear – Logo on the legs

Wama Men’s Hemp Underwear – Printed label for extra comfort
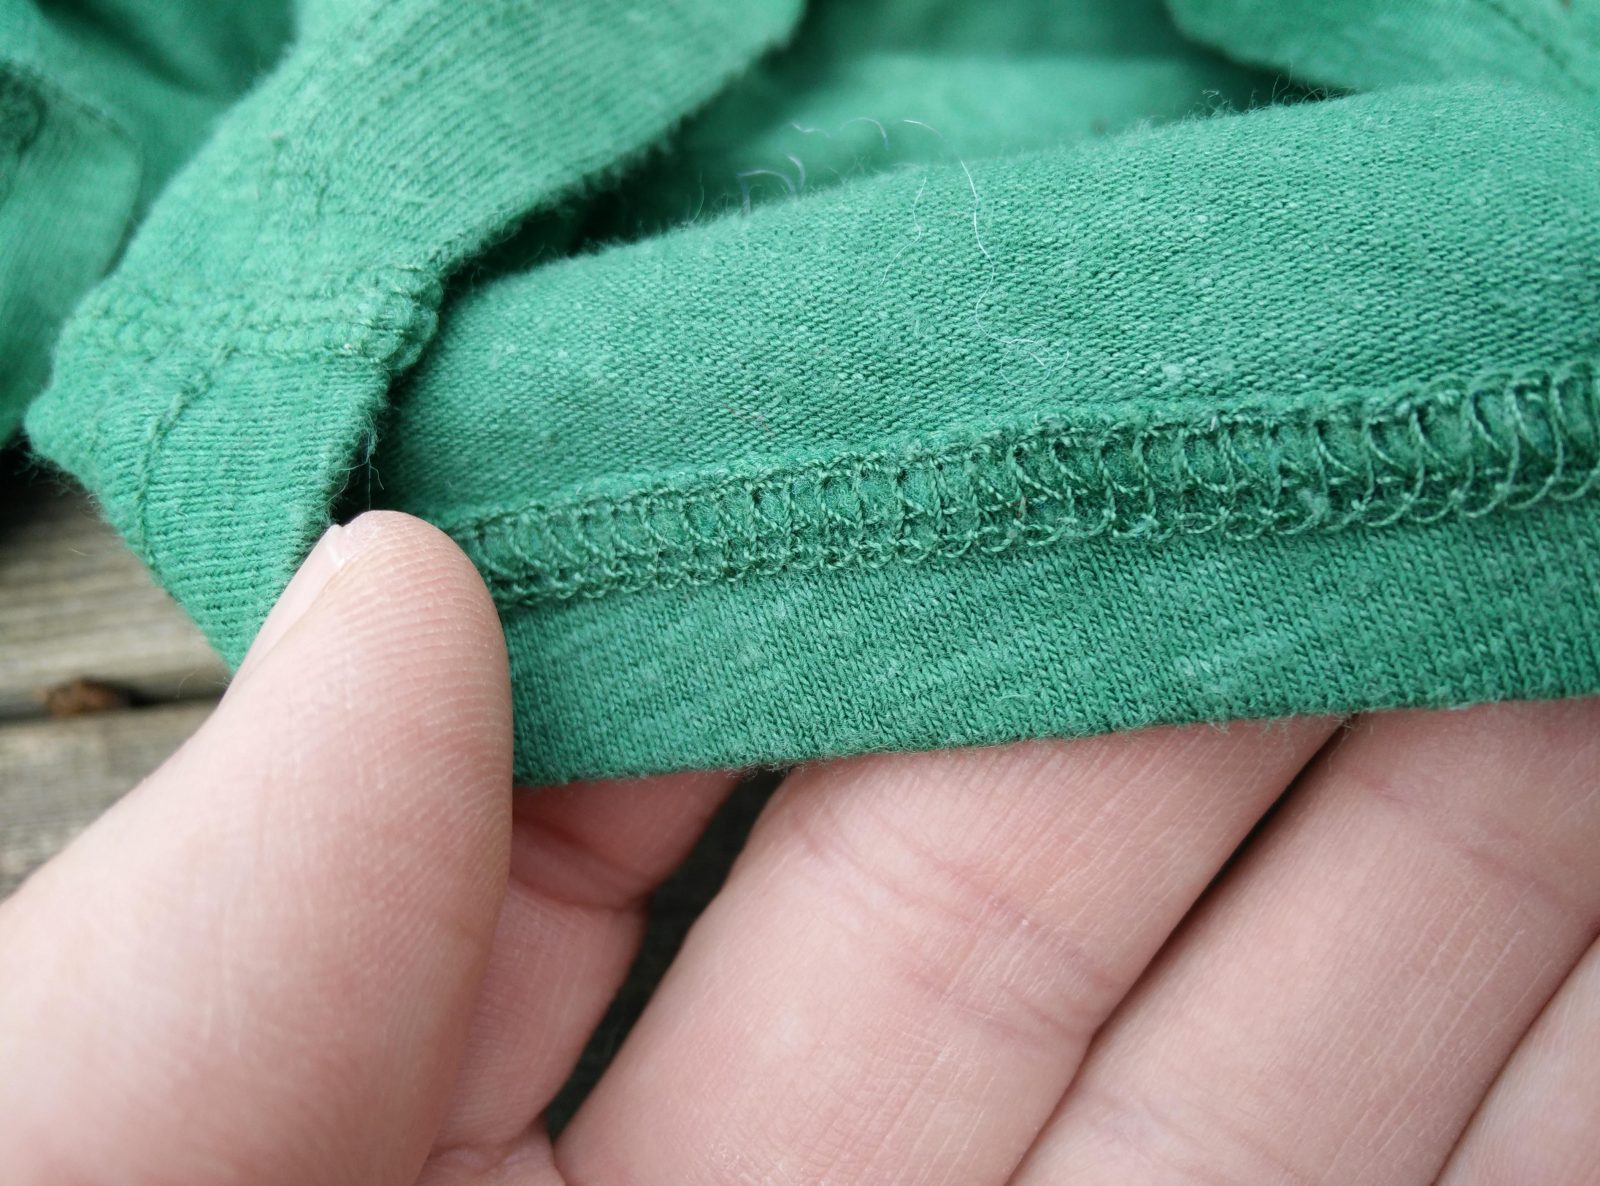
Wama Men’s Hemp Underwear – Flatlock seams are comfortable
Wama Men’s Hemp Underwear – Waistband seams cause no chafing

Wama Men’s Hemp Underwear – The Wama Boxer Briefs have a fly
Rating
| Design |  |
| Quality | |
| Comfort (for hiking) |  |
| Functionality (for hiking) |  |
About Rating
Pros:
- Fit
- Comfortable material
- Breathability
Cons:
- Drying time
- Absorbs too much moisture for sports use
{
“@context”: “http://schema.org”,
“@type”: “Product”,
“brand”: {
“@type”: “Organization”,
“name”: “Wama Underwear”
},
“image”: “https://besthiking.net/wp-content/uploads/2019/10/Wama-Men’s-Hemp-Underwear-Comparison.jpg”,
“name”: “Wama Men’s Hemp Underwear”,
“review”: {
“@context”: “http://schema.org”,
“@type”: “Review”,
“author”: {
“@type”: “Person”,
“name”: “Blaz”
},
“creator”: {
“@type”: “Person”,
“name”: “Blaz”
},
“publisher”: {
“@type”: “Organization”,
“name”: “Best Hiking”
},
“reviewRating”: {
“@type”: “Rating”,
“ratingValue”: “4”,
“bestRating”: 5,
“worstRating”: 0
},
“datePublished”: “2019-10-24”,
“name”: “Wama Men’s Hemp Underwear Review”,
“headline”: “Wama Men’s Hemp Underwear Review”,
“itemReviewed”: {
“@type”: “Thing”,
“name”: “Wama Men’s Hemp Underwear”
}
}
}
Post Author

You may also like…


The post Wama Men’s Hemp Underwear Review appeared first on Best Hiking.
Preparedness Notes for Thursday — November 28, 2019
Happy Thanksgiving, America! Despite our nation’s problems and the ongoing degradation of our liberty, we still have a lot to be thankful for! — On November 28th, 1520, Magellan finally reached the Pacific Ocean after navigating the dangerous straits on the southern tip of South America that now bear his name. He became the first European explorer to reach the Pacific from the Atlantic. Next year will be the 500th anniversary of this event. — SurvivalBlog Writing Contest Today we present another entry for Round 85 of the SurvivalBlog non-fiction writing contest. The more than $12,000 worth of prizes for …
The post Preparedness Notes for Thursday — November 28, 2019 appeared first on SurvivalBlog.com.
Dirt Poor Floor Joists for an Off Grid Log Cabin
by Todd Walker

I think I now understand why so many pioneer log cabins had packed dirt floors.
Ease of construction may have been the #1 reason. Lacking dimensional lumber, time, and labor, a dirt floor was an easy solution. You weren’t necessarily poor, but the term, “dirt poor”, stuck. Believe it or not, there’s a growing number of wealthy folk returning to earthen floors.
With my self-reliance on trial, I wanted a wooden floor for my little log cabin in the woods… complete with a front porch overlooking the creek. As promised in our last article, here’s what I came up with for my budget floor support system.
Round Log Floor Joists
A big box hardware store is a 10 minute drive from the cabin site. They sell dimensional lumber of all sizes to speed up the build. However, this whole “self-reliance on trial” thing had me going another direction.

The living area with five log joists set in place.
When I first started this project in February, the cabin dimensions were going to be a cozy 8’x10′. The first tree I felled was bucked into 10 foot sections for the 8 foot walls. Since expanding the cabin size to 10’x12′, the 10 footers wouldn’t work for wall logs. Bingo! These would become my floor joists.
Hew One Side Flat
Ax-cut logs need to be sawn flat on both ends to start the hewing process. Secure the log to cribbing with log dogs. Last year I made two from half-inch rebar which work fine. Hammer one point into the log and the other into the cribbing log. Repeat on the other end of the log.
I choose the side with the fewest knots to hew. Pine knots are a curse from the devil for hewers. The chosen side is turned and secured to the cribbing perpendicular to the ground. Dog the log before marking plumb lines.
Measure the center of the log end horizontally and place a mark at the halfway point. Place a level on the mark vertically and draw a plumb line. Do the same operation to draw a level horizontal line through the center mark. You should now have two lines intersecting to form a cross hair on the end of the log. Repeat this step on the other log end.
One more plumb line to draw before we’re done. Determine how much wood you want to remove from the side of the log. Place the level at that point and draw a vertical plumb line. I took off about an inch of wood which created ample flat surface on the joists.

Plumb and level lines drawn
Where this second plumb line meets the top of the round log, use a knife or ax to score a slit through the line. Drive a nail shallow in the cross hair. Hook the string of a chalk line box to the nail. Slip the string into the slit at the top of the log and run the chalk line to the other end of the log. Secure it in the other slit you made. While holding the line in the slit, reach down the line with your other hand and pull the chalk line up vertically, not horizontally. Release and the sting to “snap” or “pop” the chalk line.

The chalkline secured in the ax slit at the top of the line to be hewed.
By the way, all my logs have been debarked. If hewing with bark on the log, strip off a section of bark where the chalk line will be snapped. Read more about hewing with the bark on in this article.
Scoring
Scoring is the process of making relief cuts down the side of the log to remove the bulk of wood before hewing to the line. With so little wood to remove from the floor joist, I thought slash cuts would be best. Slashing is a series of overlapping 45 degree cuts about 4 inches apart down the length of the log. However, the logs had seasoned enough to make it difficult to remove wood after slashing.

Slash scoring with the log turned 30 degrees added too much extra work.
I ended up cutting “V” notches about a 8 inches apart down the log side. The raised wood between the notches are called jogs or joggles. The joggles were removed close to the chalkline with my ax. The log floor joists were all in the 6-8 inch diameter range. Not large enough to stand on to cut notches with my long-handled felling ax. I stood on the opposite side of the log and cut notches using a 26 inch boy’s ax. Make sure that the notches go all the way to the line and are plumb through to the bottom of the log.
Joggling or Juggling
Now is the time to remove the joggles. On these small logs, I used the grub bit of my double bit felling ax mostly. The 36 inch handle allowed me to swing almost upright, saving my back. Removing this excess wood can be the most dangerous part of the whole hewing process. A forceful swing is needed to knock off the protruding joggles. Be aware of where your legs and feet are before swinging.

I hewed several logs with my double bit only.
My most comfortable stance was to straddle the log with my right foot well to the right of the log. A slight bend at the waist and knees adds insurance that the ax will strike the ground and not my boot. The grub bit will strike the ground as it passes through the wood from time to time. Wood chips create a barrier between the bit and ground as the process continues.
A safer way to remove joggles is to rotate the log on the cribbing about 30 degrees (captured two photos above). A lateral swing (out of the frontal zone) is used with the log between you and the moving ax. You’ll need to re-plumb the log before hewing to the line.
Hewing
With a thin layer of wood (1/2 inch or less) proud of the chalkline, hewing begins. I used my broad ax on some, and the double bit felling ax on others. I’ve become fond of using the longer double bit even for hewing. It dealt with lighter’d knot better. I found that once the joists were rough-hewn with the double bit, I could set them in the sill log notches and comfortable hew high spots by swing horizontally with my broad ax. And it could be done while I sat on the adjacent joist.

Hewing to the line with the double bit ax. This log was almost too short to use. Notice the ax-cut end almost makes a nice tenon.
The angle in which the double bit struck the wood had to be adjusted. It’s not a vertical swing like the broad ax. Once the angle is dialed in, the wood begins to slice off. I actually obtained smoother finishes using the double bit over the broad ax. I got closer to the chalkline as well. Keep in mind, this is rough-hewn lumber.
Mortise and Tenon
Before joists could be set, a level line was needed on the inside of the sill logs. Using a water level, I penciled in marks on all four corners. A chalkline was snapped to give me a level line on the two sill logs where the top of the joists would rest.
I marked the sill logs at 2 foot intervals for joist positions along the 12 foot walls. Mortise joints (pockets) were cut into the sill log with a 2 inch chisel and dogwood maul. The mortise pockets measured about 2″x4″. Each joist measurement, from pocket to pocket, was different. Working with round logs of differing diameter is entirely different from building with dimensional lumber.

The faint blue chalkline is still visible. This joist needed to be lowered. I switched to red chalk as it seemed to last longer.
Tenons were cut on the ends of each joist to match the mortise pockets. Joists were set and raised or lowered to meet the level line on the sill logs. A simple wedge of wood underneath or trim of the tenon did the trick.

Mortises chiseled to 2″x4″ dimensions.
Leveling Joists

The four-foot level on top of the aluminum bar extended my reach to four joists at once.
Though each joist tenon met the level line on the sill logs, rough-hewn logs will have high spots… at least from a hewer like me. I used a long piece of rectangular aluminum as a straightedge coupled with a 4′ level to ride atop four of the five joists. I moved the level from sill to sill checking for high spots and dips in the joists.

Close enough!
Taking a comfortable sitting position on an adjacent joist, I planed the high spots down with the broad ax. This was a great change of pace on how I typically swing this heavy hewing ax. Recheck level, plane, recheck, plane… until my OCD subsided. It’s close enough for an off-grid log cabin in the woods!
After shimming and shaving to level joists, I carved and drove wooden wedges into the mortise pockets to take away any wiggle that might be present in the joints. I’m following the same process for the front porch log joists. I’m running 3 long joists perpendicular to the living area joists with a girder underneath at the halfway point. The 6’x12′ front porch will provide hours of relaxing ambiance as creek water tumbles over rocks.

One more porch joist to add…
Keep Doing the Stuff of Self-Reliance,
~ Todd
P.S. – You can also keep up with the Stuff we’re Doing on Twitter, Pinterest, YouTube, Instagram, and Facebook… and over at our Doing the Stuff Network.
P.P.S – If you find value in our blog, Dirt Road Girl and I would appreciate your vote on Top Prepper Sites! You can vote daily by clicking here or on the image below. Check out all the other value-adding sites while you’re there…

Thanks for Sharing the Stuff!
Copyright © by Survival Sherpa: Content on this site (unless the work of a third-party) may be shared freely in digital form, in part or whole, for non-commercial use with a link back to this site crediting the author. All links in articles must remain intact as originally posted in order to be republished. If you are interested a third-party article, please contact the author directly for republishing information.
Muzzle direction is the primary safety
Muzzle direction is the primary safety. Always has been and always will be.
–Bill Rogers of the elite Rogers Shooting School
“He told police he was oiling a handgun and had put a magazine in it and racked the slide when it fired, hitting his wife as she sat on a couch nearby.”
Man sentenced to probation in shooting of his wife
I absolutely despise the meme from Blackhawk Down that shows a trigger finger with the phrase “This is my safety.” Trigger finger discipline is a good thing but there’s a reason it’s Number 3 in the Four Rules of Gunhandling. Muzzle Direction is Number 2, as it should be in the scheme of things.

34 Awesome (& Simple) Home Automation Ideas

Smart home (or home automation) technology has been around in a serious way since the 90’s, but it was generally reserved for those with big budgets or for the really …
The post 34 Awesome (& Simple) Home Automation Ideas was written and published on 24/7 Home Security.
Scary Sharp: Rooster’s Foolproof Ax Sharpening Method
by Todd Walker

“Give me six hours to chop down a tree and I will spend the first four sharpening the axe.”
This quote, falsely attributed to Abraham Lincoln, is inspirational but scary to anyone new to ax-manship. I get the idea of the quote. But four hours to sharpen an ax?
Okay, if an ax is in really bad shape, you could spend a few hours on the work bench. But once you’ve spent time achieving a keen edge, you’ll understand why Horace Kephart advises to never loan your ax to someone unless they know how to use it. A dull, abused ax a misery to swing and quite a job to bring back to working-sharp.
Scary Sharp Axes
I’ve always kept my working axes Sherpa Sharp, which by definition is a bit honed enough for a day of feeling, limbing, and bucking logs without needing to be touched up in the field. My method changed four years ago when Craig Roost (aka – Rooster) introduced fellow Axe Junkies to his simple Scary Sharp method.
If you’ve never been able to shave arm hair or slice newsprint with your ax, give Rooster’s Scary Sharp method a try.
Below is a list of stuff I use to sharpen my axes in the shop and field.
My Shop Tools
- Wet/Dry Sandpaper: Progress from 220, 400, 600, 1,000, and at times 1500 – auto parts stores carry this sandpaper in 9″ x 11″ sheets
- Bench Belt Sander: 80 to 120 grit
- Drywall Hand Sanders: One for each wet/dry sandpaper grit to speed up the process
- Leather Strop: A barber’s strop glued to a board
- Green Buffing Compound: Rub into the leather strop
- Buffing Wheel: Rarely use this machine on working axes
- Files: Bastard file is used for bits needing to be re-profiled or when nicked/chipped
- Rigid SuperClamp: This floor vise has revolutionized my shop
- Safety Equipment: Leather gloves and eye protection

Files, file card, 220, 400, 600, 1,000 grit sanders, and a leather strop impregnated with green rubbing compound.
My Field Tools
- Ax Puck: Medium and coarse duel sided grit
- Strop: Leather belt, leather ax sheath, or wood
- File: A small bastard file
- DiY Fixin’ Wax
Refer to the Ax Anatomy chart below if you’re unfamiliar with any of the terminology in the tutorial. 
Shop Maintenance System
You may sharpen your axes differently. This is the system I use to maintain my working axes. The condition of vintage axes I restore varies from light rust removal with a wire wheel to major vinegar bath and material removal with a file. This post is not intended to cover the complete restoration process of old axes. It’s a maintenance step to keep working axes sharp. Even “out of the box” axes likely need to be honed before severing wood fibers.
Belt Sanding
All new-to-me vintage ax bits typically go on the belt sander first. Hold the axhead so that the sanding belt moves from the poll of the ax to the bit. The other way around will end up severing the sanding belt. Work the bit from toe to heel on the part of the belt that gives way to pressure. In this way, the belt conforms to the convex grind angle of the ax bit.

This is my sweet spot on my homemade belt sander.
Make a few passes on one side and repeat on the other side of the bit. I sand both sides maybe three times with 80 grit depending on the need. Swap out to 120 grit and repeat the process.
I don’t use leather gloves. I want to feel the warmth of the ax bit during the sanding process. The axhead is dipped in water several times throughout the process to keep it cool and preserve the temper of the bit.
Hand Sanding
Hand sanding can be done without a vise (see Rooster’s video below). However, my Rigid floor vise makes the process easier and faster. Clamp the handle in the vise with the axhead perpendicular to the floor. Stand to the side and behind the bit you’re going to sharpen. Now would be the time you’ll want to wear leather gloves.
Below is a video demo of me sharpening my broad ax with a 12 inch bit…
Cut a strip of each grit to fit the drywall sanding handle(s). With as much sharpening as I do, multiply handles with each grit attached saves time from having to change out sand paper if using only one handle. Plus, I had these handles in my drywall box from my handyman days. Using them to sharpen axes is way more pleasurable than their intended use.
Begin swiping from heel to toe of the ax bit with the 220 grit sand paper. Move the sander in a semicircular motion. You’ll be reminded of Dustin Hoffman’s character in the movie Rain Man with all the counting you’ll be doing. I stroke one side 30 times. There’s no magic number to this and you don’t have to count – it’s just what I do. I flip single bit axes in the vise and sand the other side 30 times. For my double bit axes, I reposition on the opposite side and stroke the second bit before flipping the ax.
On the second grit, 400, I change from a “heel to toe” direction to a “toe to heel” stroke. This helps me see how well I’m replacing the previous scratches on the bit left by the 220 grit. Continue changing grits and direction until you make it to the highest sanding grit. Most times, I only need to go to 600 grit and a good stropping to get my working axes Sherpa Sharp. I rarely go up to 1,500 grit unless I’m sharpening a new-to-me ax.
Stropping
I glued an old leather barber’s strop to a wooden handle years ago. I rub green compound into the leather and use it in the same way as the sanding handles. I only strop the bit about 10 times on each side to remove any burrs and give the bit a mirror finish.
Rooster even made a strop for a drywall sanding handle. He demonstrates his full method in the updated video below.
Rooster’s method produces remarkable results. The foam pad under the drywall sanding handles allows the sandpaper to conform to the convex shape of the bit. So simple a novice can do it!
Field Maintenance System
There have been times when I lay into a tree and notice the bit not penetrating the wood fibers very well. This is usually because I failed to sharpen my ax in the shop before heading out. You may be tempted to overcompensate with more power in each stroke. Not a wise idea. This will lead to early fatigue, damage to the handle, and possible injury. Stop swinging and touch up the bit.
Puck It
For years I’ve used a Lansky Puck to touch up axes in the field. The course side is 120 grit with the other side being 280 medium grit. The medium grit (280) is all I use to hone in the field. I use water, not oil, on my puck since I always have water available. Sometimes I use it dry. Either way, I rarely use this stone if I’ve “Rooster’d” my axes in the shop beforehand.
Grip the puck so that your fingers and thumb are not hanging over the bottom of the stone for obvious reasons. Make several circular strokes down and back on one side of the ax bit. Flip to the opposite side of the bit and repeat. I like to hold the ax so its bit in my line of sight. I can adjust the angle of the puck to meet the bit edge as needed. For double bit axes, I sink one bit into a stump to hold the ax in place while sharpening.
I strop the edge with the leather ax sheath to remove burrs as a final step. A piece of wood can also be used as a strop.
I apply a coat of DiY Fixin’ Wax to the axhead when I think about it. This helps prevent rust, which isn’t usually a problem until carbon steel sets for a while. Due to the beef tallow content in my Fixin’ Wax, it also helps to remove pine sap from my tools.
Steven Edholm (SkillCult) has a video of how he made a field “puck” from a Japanese water stone. Pretty creative. The stone has 250 and 1,000 grit sides. I have a stone like this but haven’t made the field puck yet.
We’re interested in learning how you keep your working axes sharp. Let us know in the comments, please.
Keep Doing the Stuff of Self-Reliance,
~ Todd
P.S. – You can also keep up with the Stuff we’re Doing on Twitter, Pinterest, YouTube, Instagram, and Facebook… and over at our Doing the Stuff Network.
P.P.S – If you find value in our blog, Dirt Road Girl and I would appreciate your vote on Top Prepper Sites! You can vote daily by clicking here or on the image below. Check out all the other value-adding sites while you’re there…
Thanks for Sharing the Stuff!
Copyright © by Survival Sherpa: Content on this site (unless the work of a third-party) may be shared freely in digital form, in part or whole, for non-commercial use with a link back to this site crediting the author. All links in articles must remain intact as originally posted in order to be republished. If you are interested a third-party article, please contact the author directly for republishing information.

Personal Protection Devices for Home
When the SHTF, inner city thugs will likely travel in gangs targeting individual homes for looting and home invasions. Mass panic will have city folks
General Do It Yourself Safety
The home can be a highly dangerous area so every one doing DIY needs to take some precaution and, more importantly, use common sense. The

Fire Safety: How to Protect Your Home During the Holiday Season
During the holidays, all too often in our rush to get everything done to make the season special we overlook some of the basic safety
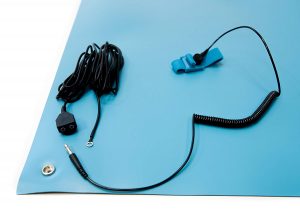
Bertech ESD Mat Review
Bertech is a leading manufacturer of Electro Static Discharge (ESD) Products. Static control is essential during electronic manufacturing. Bertech ESD mats are designed to provide

What To Do If You Have Industrial Dermatitis
Dermatitis is a skin infection that usually appears in the hand and then slowly spreads to the body if proper care is not taken. Industrial
How to Use a Stun Gun
Do you want Peace of Mind in our troubled times? Do you walk by yourself maybe late at night in questionable neighborhoods? A Stun Gun

10 Ways to Increase Your Personal Safety
Here are 10 very simple and easy ways to keep yourself prepared for any situation. Read our personal safety tips to gain awareness and increase

Dealing With Bullies at School
Bullying has escalated to an entirely new level these days, not only in frequency but also in application. With technology being what it is kids

OC Spray – Self Defense with Pepper Spray
Often times people will ask why should I buy pepper spray? I will probably never need it. Let me tell you about a time when

Taser C2 Review – Taser Self Defense Products
The TASER series has almost 100% effectiveness rating. It combines the injury reducing benefits of traditional stun technology with a quantum leap in stopping power

Uses For An Led Flashlight In Your Car
When you are navigating the roadways, it’s important to remember that anything can happen to you and your vehicle at any time. Your vehicle could

Best Winter Jackets for Extreme Cold
As we move into Fall in the northern hemisphere, it’s time to unpack the thermals and get out your winter gear. There’s recently been some

Heated Tarp Shelter – How to Build a Tarp Shelter in the Snow
Check out this video from Modern Survival Tactics and their use of a heated tarp shelter overnight in the snow. We’ve also transcribed the video

How to Find Water in the Wild
Finding safe drinking water, such as running water, is critical to wilderness survival. Learn to dig a hole to get clean, pure water from an